Taking apart an office chair might seem like a tricky task, especially if you’re not sure where to begin or how to avoid damaging it. Whether you’re moving to a new office, cleaning out your workspace, or just need to swap out some parts, knowing how to disassemble your chair the right way can save you a lot of time and hassle. The last thing you want is to end up with broken pieces or a chair that’s harder to put back together!
Key Takeaways
- Use the right tools. Ensure you have screwdrivers, wrenches, and possibly a pipe wrench for stuck parts.
- Start with the wheels, then remove the seat, backrest, and mechanisms.
- Use WD-40 for stuck wheels or gas cylinders; avoid using too much force.
- Keep screws and small parts in labeled containers for easy reassembly.
This guide will walk you through the steps of disassembling an office chair safely and efficiently, minimizing the risk of damage.
Before You Begin: Tools and Preparations
Start by checking your office chair’s manual if you still have it—it usually provides detailed instructions for taking apart each part and points out any tricky components that need extra care. If you can’t find the manual, try downloading one from the manufacturer’s website. Before you begin disassembling, take clear, step-by-step photos of every part, including how screws, washers, and brackets are connected. These pictures will be a great reference when you’re reassembling the chair, making the process much smoother and preventing any confusion later on.
Also, make sure you have everything you’ll need ready. The exact tools you’ll need can vary depending on your chair model, but the following are commonly required:
- Screwdrivers (flathead and Phillips)
- Allen wrench set
- Rubber mallet
- Adjustable wrench or pliers
- Lubricant (like WD-40)
- Gloves
Step-by-Step Guide to Disassembling an Office Chair
By carefully following these instructions, you’ll learn how to safely and efficiently take apart your chair without damaging any components.
Step 1. Removing the Wheels
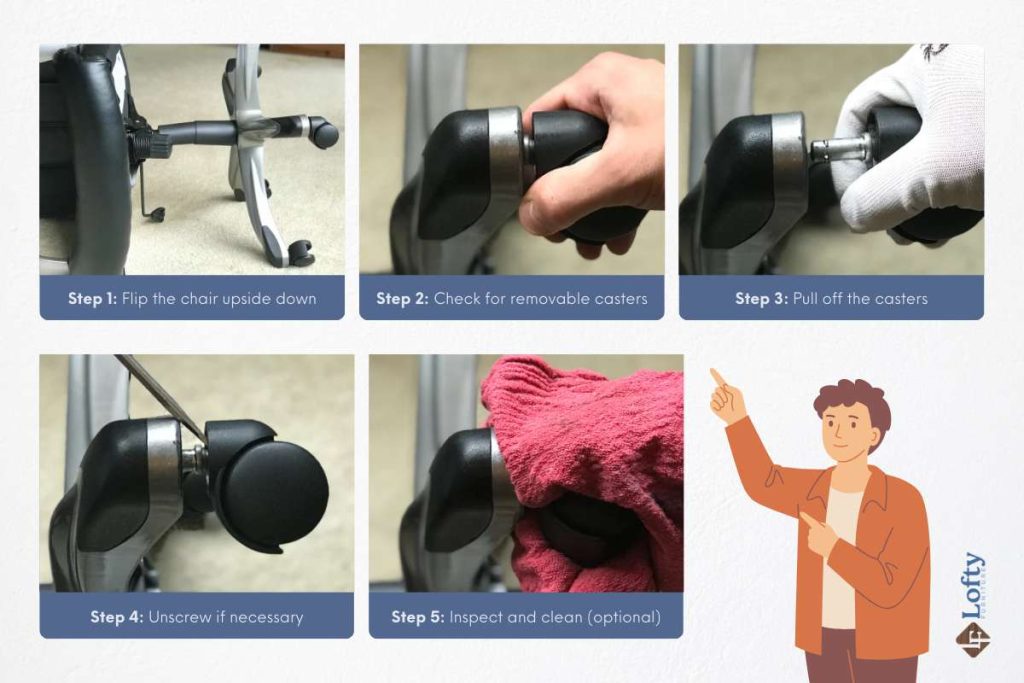
- Flip the chair upside down: Place the chair on a flat, sturdy surface to access the wheels easily. Use a towel or blanket underneath to prevent scratches.
- Check for removable casters: Examine the wheels to see if they’re attached with screws, clips, or simply snapped into place. Most office chair wheels are pop-in models.
- Pull off the casters: For pop-in wheels, firmly grip the caster with your hand and pull it out. If it’s stuck, use a flathead screwdriver or pry bar for leverage.
- Inspect and clean (optional): Check for dirt or debris clogging the wheels. This is a good time to clean or replace them if needed. For stuck wheels, apply lubricant by spraying a small amount of WD-40.
Step 2. Detaching the Base and Gas Cylinder
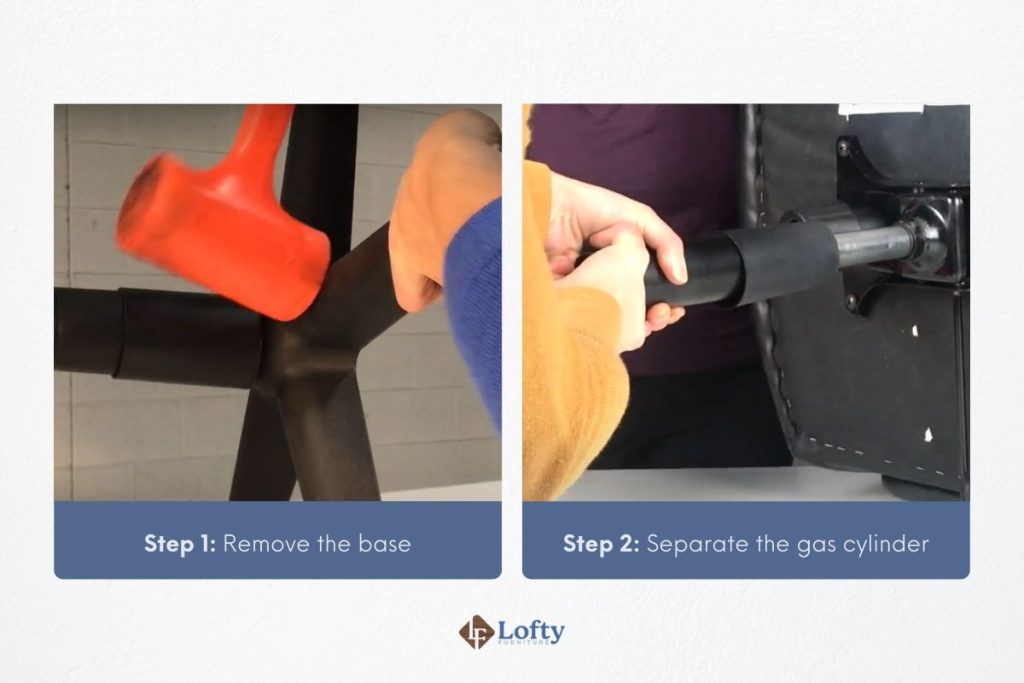
The gas cylinder connects the chair’s seat to the base and allows height adjustments. It’s a pressurized component, so extra care is needed when removing it to prevent damage or injury.
- Remove the base: Hold the chair’s gas cylinder and gently twist the star-shaped base (the part that holds the wheels). You may need to tap the base lightly with a rubber mallet to loosen it.
- Separate the gas cylinder: Once the base is removed, you’ll see the gas cylinder connected to the seat mechanism. Grip the cylinder firmly with a wrench and twist it counterclockwise to detach it. Once removed, store the cylinder in a safe location.
Step 3. Unscrewing the Seat and Armrests
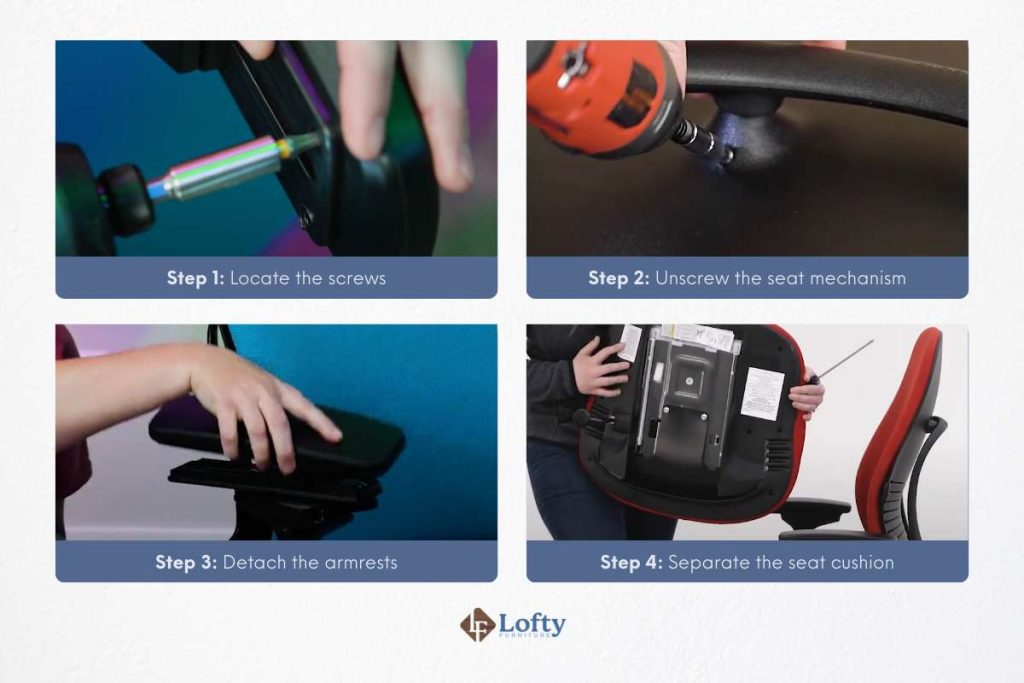
- Unscrew the seat mechanism: Locate the screws. Using the appropriate screwdriver or Allen wrench, loosen and remove the screws attaching the seat to the chair mechanism.
- Detach the armrests: If the armrests are bolted to the seat or backrest, unscrew them one at a time. Some armrests may have covers that need to be pried off to access the screws.
- Separate the seat cushion: After removing all screws, lift the seat cushion away from the chair frame. Set it aside safely. Keep screws and small parts organized by placing them in labeled bags or containers for easy reassembly.
Step 4. Disassembling the Backrest and Other Attachments
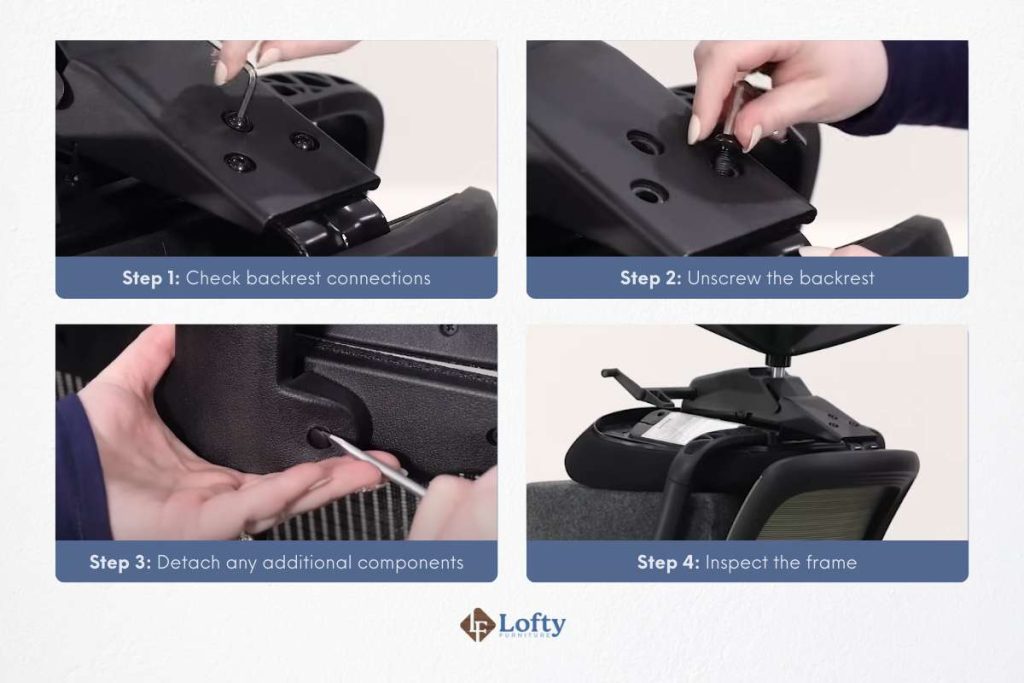
- Check backrest connections: Look for screws, bolts, or knobs connecting the backrest to the seat or frame. These may be visible or covered with plastic caps.
- Unscrew the backrest: Use the appropriate tool to remove the screws or bolts holding the backrest in place. If it’s attached with a sliding mechanism, carefully slide it out.
- Detach any additional components: If your chair has lumbar support, headrests, or other adjustable attachments, unscrew or unclip them as needed.
- Inspect the frame: With the backrest removed, examine the remaining frame to ensure all parts have been detached properly.
For chairs with built-in tilt or recline functions, consult the manual to understand how these mechanisms are attached.
After Disassembly: Next Steps
Once you’ve disassembled your office chair, the next step is to handle the components properly to extend their lifespan and make reassembly smoother.
Cleaning and Maintaining Chair Components
After disassembly, start by cleaning and maintaining the chair’s components. Inspect each part for signs of wear or damage, replacing anything that is no longer functional. Clean plastic and metal parts with a damp cloth and mild detergent, while fabric or mesh surfaces can be vacuumed and spot-cleaned with upholstery cleaner. Lubricate moving parts, like the wheels and swivels, with silicone-based lubricant to keep them functioning smoothly.
Storing or Recycling Disassembled Parts
Keep small components like screws and wheels in clearly labeled containers, while stacking larger parts in a cool, dry place to avoid warping or rust. If recycling, check local programs that accept furniture parts. According to the US Environmental Protection Agency (EPA), a staggering 80.1% of furniture waste ends up in landfills. To reduce waste, consider recycling metal parts like the gas cylinder and chair base or donating usable components to charity.
Tired of your old chair?
Upgrade to one of our modern ergonomic chairs for all-day comfort and better posture.
Reassembly Tips
When it’s time to reassemble the chair, following the right steps is key to success. Begin by referring to the chair’s user manual if available. Reassemble the chair in reverse order of disassembly, starting with the backrest and seat before moving to the base and wheels. Tighten all screws and bolts securely, but be cautious not to over-tighten, which could damage the threads. After reassembly, test all moving parts to ensure the chair operates smoothly.
Thinking of upgrading your workspace after disassembling your old chair?
Pair your next setup with one of our Amish adjustable desks for better comfort and flexibility.

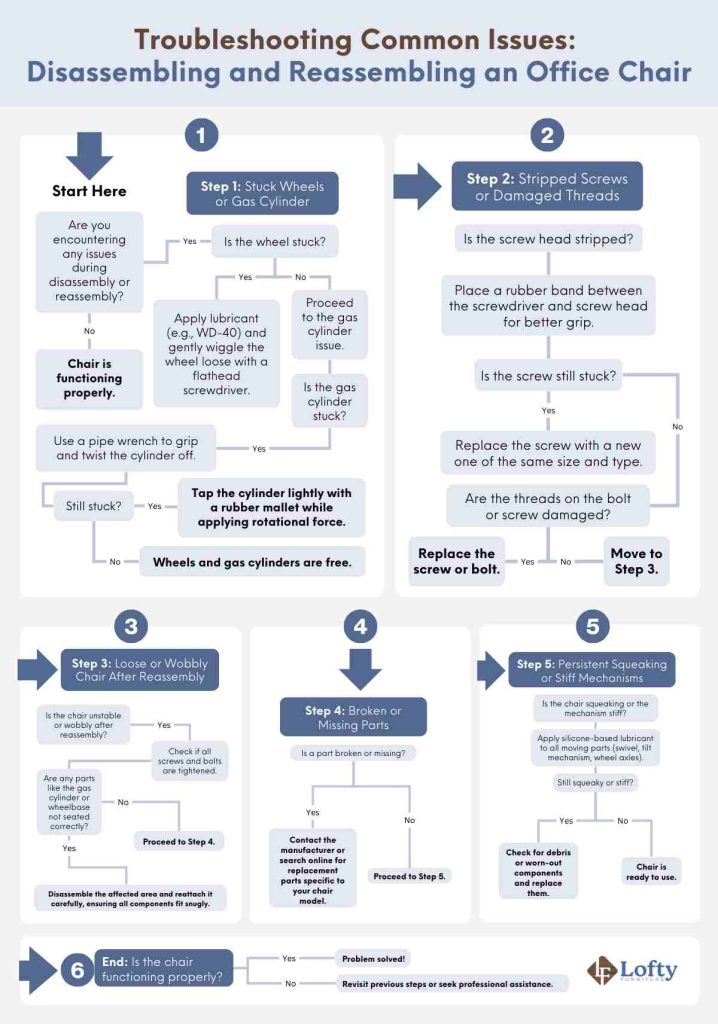
Troubleshooting Common Issues When Disassembling Office Chairs
Disassembling and reassembling an office chair may not always go as planned. Below are some frequent problems and practical solutions to address them.
1. Stuck Wheels or Gas Cylinder
One of the most common issues during disassembly is removing stuck wheels or a gas cylinder. For wheels, apply a lubricant like WD-40 around the attachment point and gently wiggle them loose with a flathead screwdriver if needed. For a stubborn gas cylinder, use a pipe wrench to grip the cylinder tightly and twist it off. If this fails, tapping the cylinder lightly with a rubber mallet while applying rotational force can help.
2. Stripped Screws or Damaged Threads
If a screw is stripped, use a rubber band between the screwdriver and the screw head to gain better grip and leverage. For severely damaged threads, you may need to replace the screw or bolt with a new one of the same size and type.
3. Loose or Wobbly Chair After Reassembly
If your chair feels unstable after reassembly, double-check that all screws and bolts are properly tightened. Sometimes, specific parts like the gas cylinder or the wheelbase may not be seated correctly. Disassemble the affected area and reattach it carefully, ensuring all components fit snugly.
4. Broken or Missing Parts
In some cases, you might discover broken or missing parts during disassembly or reassembly. If this happens, contact the manufacturer or search online for replacement parts specific to your chair model.
5. Persistent Squeaking or Stiff Mechanisms
A squeaky chair or stiff mechanisms can be annoying and are often caused by a lack of lubrication. Apply a silicone-based lubricant to all moving parts, such as the swivel, tilt mechanism, and wheel axles. If the issue persists, check for debris or worn-out components that might need replacement.
Ready to upgrade or replace your office chair after disassembling it? Explore our top picks for ergonomic office chairs to find the perfect fit for your workspace!
Conclusion
With the right tools, patience, and knowledge, it’s entirely possible to disassemble an office chair without causing damage. By following the proper steps for disassembly and reassembly, you can not only repair or replace worn-out components but also maintain the longevity and functionality of your chair. When done carefully, disassembling an office chair can save you money on repairs and replacements, and it offers the opportunity to recycle or reuse parts for other purposes.
FAQs
Can I disassemble any type of office chair?
Yes, most types of office chairs can be disassembled with the proper tools and techniques. However, some chairs with integrated or complex mechanisms might require more specialized knowledge or tools. Always check the manufacturer’s instructions before disassembling.
How do I properly store the disassembled parts?
Use labeled containers or bags to separate small parts like screws and bolts. Place larger parts in a safe area where they won’t be scratched or bent.
Are there any common mistakes to avoid when disassembling an office chair?
Some common mistakes include using the wrong tools, applying excessive force, and forgetting to keep track of the parts. To avoid these issues, always use the correct tools, work slowly, and take notes or photos of the chair’s original assembly for reference during reassembly.
Is it possible to recycle office chair parts?
Yes, many office chair parts can be recycled. The metal frame, plastic components, and even the fabric can often be recycled, though it depends on the material and local recycling guidelines.

gasdg